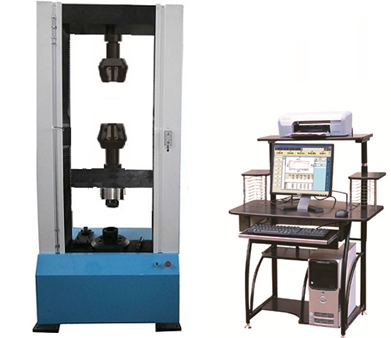
WDW-600 microcomputer control electronic universal testing machine is a new generation microcomputer control electronic universal testing machine specially designed for universities and scientific research institutes.
1. Product introduction
WDW-600 microcomputer control electronic universal testing machine is a new generation microcomputer control electronic universal testing machine specially designed for universities and scientific research institutes. The computer system controls the rotation of the servo motor through the all-digital controller, the speed regulating system, and the moving beam is driven up and down by the precision ball screw pair after the deceleration system, to complete the tensile, compression, bending, shearing and other mechanical properties tests of the sample. In addition, a wide variety of test accessories are configured. It has a very broad application prospect in the mechanical properties test of metal, non-metal, composite materials and products. This machine is widely used in building materials, aerospace, machinery manufacturing, wire and cable, rubber and plastic, textile, home appliances and other industries of material inspection and analysis, is scientific research institutions, colleges and universities, industrial and mining enterprises, technical supervision, commodity inspection arbitration and other departments of the ideal test equipment.

2. Main technical indicators
1. Maximum test force: 600kN
2. Test force measurement range: 0.4%--100%
3. Test force indication accuracy: better than ±1%
4. Test force resolution: 1/500000(ungraded throughout)
5. Beam displacement measurement accuracy: resolution higher than 0.0025mm
6. Deformation measurement accuracy: ±0.5% (in the range of 0.2-10mm)
7. Test speed range: 0.001-200mm /min, stepless speed regulation
8. Speed control accuracy: ±1%(0.001~10mm/min);
9. Constant force, constant deformation, constant displacement control range: 0.2%-100%FS
10. Constant force, constant deformation, constant displacement control accuracy:
When the set value is <10%FS, the set value is within ±1.0%
When the set value is ≥10%FS, the set value is within ±0.1%
11. Deformation rate control accuracy: rate <0.05%FS is within the set value of ±2.0%
Rate ≥0.05%FS is within the set value of ±0.5%
12. Test space: A: stretching space :700mm B: compression space :700mm
13. Fixture form: wedge clamp specific
Flat jaw: 0-20mm Round jaw: Ø14-Ø40mm
14. Clamping mode: hydraulic clamping (independent clamping oil source)
15. Pressure disc size: φ150mm
16. Power supply: three-phase,380V±10%,50Hz, power: 4kW
17. Working environment: room temperature -35 ℃, relative humidity does not exceed 80%
19. Weight: About 3.5 tons
3. Solution description
1 Host
1.1 The host adopts floor frame structure, high strength, small deformation, beautiful appearance;
1.2 Imported high-precision ball screw, efficient and stable transmission;
1.3 High precision spoke load sensor, high measurement accuracy, good stability;
1.4 The transmission part is driven by circular arc tooth synchronous belt, and there is no two-way gap in the transmission process;
1.5 AC servo motor and drive system is adopted to ensure smooth transmission, stable torque, with overcurrent, overvoltage, overload and other protection devices, speed ratio can be greater than 1:100,000;
1.6 The fixture is specially designed, the clamping is firm, the operation is convenient, there is no clamp slip phenomenon;
1.7 The special process ensures the coaxiality of the testing machine and eliminates the influence of irregular samples on the sensor.
4. Control system
The full digital closed-loop measurement and control system has many advanced characteristics and technological innovations, mainly reflected in:

1. Realized four kinds of closed-loop control of test force, sample deformation, beam displacement and test process;
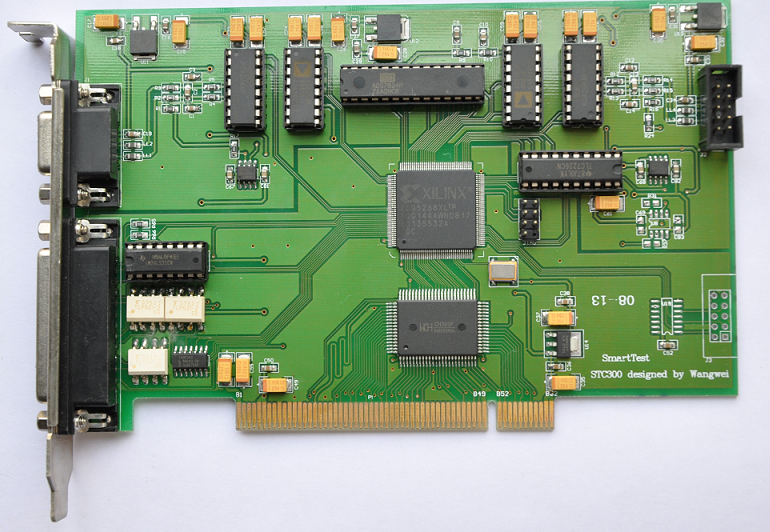
2. The data acquisition system consists of 4 high-precision 24-bit A/D conversion channels. The highest resolution is 1/500000, the whole process is not divided;
3, Choose BB, AD, Xilinx and other original brand integrated devices, all digital design;
4, in line with PCI bus standards, microcomputer automatic identification and installation, so as to "plug and test";
5, electronic measurement system without analog components such as potentiometers, to ensure interchangeability, easy maintenance and replacement.
5. Control software
In line with GB228-2002, GB228-2010 and other more than 30 national standards, while according to GB, ISO, JIS, ASTM, DIN and users to provide a variety of standards for testing and data processing, and has good scalability.
6. Perform basic system configurations
1, testing machine host (floor frame structure)
1.1 AC servo motor and servo driver
1.2 High-precision load sensor
1.3 Imported precision ball screw pairs
1.4 Deceleration system (circular tooth synchronous belt drive)
2. Resolution of STC300 dual-channel programmed amplifier is 1/500000
3, testing machine special three closed loop control software
4, extension meter (Beijing Steel Institute YYU50/25)
5, photoelectric encoder
6, a full set of accessories including: stretching, compression accessories, mobile protective cover
7. Dell or Lenovo brand computers
8. HP A4 laser printer
9. Technical data: instruction manual, software manual, certificate, packing list
 Fresh-Keeping Box Food Packaging Bag Compression And Pressure Resistance Testing Machine
 Fresh-Keeping Box Food Packaging Bag Tensile Testing Machine
 NDW-10000 Microcomputer Controlled Material Torsion Testing Machine
 WDS-5 Digital Display Electronic Universal Testing Machine
 YAW-300D Electronic Folding And Compression Machine
 WDW-5 Microcomputer Controlled Electronic Universal Testing Machine (Food Packaging Compression)